Using Custom Chrome Tabs in your Android App
- Joseph Muller III

- Jun 8, 2020
- 8 min read
Web Content in Android
For the longest time, Android app developers had only two options when it came to accessing web content in their mobile applications. Use a third party app or implement a native Webview. Both of these solutions were imperfect and they forced developers to make sacrifices in the areas of performance or navigational experience.
In 2015 however, Custom Chrome Tabs were introduced as a third option that did not involve making any sacrifices. In short, Custom (Chrome) Tabs are a lightweight component that you can use to browse the internet within your application. They require less technical overhead, allow for visual customizations, and are nearly twice as fast as the older two options.https://lonercoder.wordpress.com/media/588a0066786b826bd68a86814c8f0116
Third Party Apps
When a user needs to open a URL, the most obvious solution is to open a third party app that can handle the request. This would involve creating an intent that carries the URL and sending it out to the Android system where it can be matched to an intent filter in one of the device’s applications.
The Pros
Quick and easy. If you have a URL, you can speedily send it away to the Android system and be done with it.
Respects user’s browser preference. If the user has a preferred browser that they open URL links in, they will be taken there.
User cookies. Since the user will be straight up using the browser where the cookies are stored, they’ll benefit from quicker logins and suggested inputs.
Browser features. Features like sharing content, searching for words in a web page, and having multiple tabs open will be available.
The Cons
Heavy transitions. Jumping from the mobile application interface to an entirely separate activity can be jarring.
No UI Customizations. Branding is impossible.
Control. Once you leave your app, you no longer have control over what the user sees.
WebView
WebViews are a View that can display the contents of a web page directly in your app.
The Pros
Light transitions. Since the WebView is embedded in the layout of your app, the user will not notice any drastic changes when navigating between activities or fragments.
UI Customizations. The WebView is a View object and as such can be customized like one.
Control. If you want to change the UX or adjust how the user interacts with it, you can.
The Cons
No shared cookies. Without access to the user’s saved data, browsing will be slower
No browser features. Browser applications like Chrome benefit from all of the newest features and updates. If you’re using a WebView, improvements and maintenance become your responsibility.
No safety. In a webview, “any malicious code has the same rights as the application” so you need to make sure users don’t load any harmful URLs.
More technical requirements. Loading HTML, CSS, and JavaScript can have some weird effects and you may need to treat different web pages differently.
No maintenance. If you create a WebView, it’s likely that you’ll be the only one maintaining it and because the web is always changing, you may be overwhelmed in the future.
Chrome Custom Tabs
Custom Tabs are supported starting with Chrome version 45 and offer a near-seamless way to transition from your app to the web. They are fast and customizable and you should probably switch to them as soon as possible. If you’re not sure if you should use them, check out “When should I use Chrome Custom Tabs vs Webviews”.
The Pros
Simple implementation. You don’t have to worry about managing page requests or granting permissions to websites.
Better performance. By pre-warming the browser and preemptively loading URLSs, browsing is extremely fast.
Light transitions. Custom tabs open over your existing activity. Selecting the close icon in the upper left corner of the tab immediately brings you back to where you left off.
UI customizations. Custom tabs let you change almost everything about how the tab looks. Toolbar colors, action icons, menu options, and the web page title can all able be changed.
Navigation awareness. Callbacks received from the Custom Tab can be used to monitor the user’s movement within the tab.
Cookies. Chrome tabs share cookies with the actual Chrome browser so users stay logged into their favorite websites.
Safe browsing. Chrome Custom Tabs specifically use Google’s Safe Browsing feature to warn users when they are about to navigate to a potentially dangerous site.
The Cons
While most people seem to enjoy the convenience of Custom Tabs, a few people have voiced their criticisms.
A single tab. That’s right, you can only have a single tab open in the Custom tab at once and the only way to get to an actual browser is through the “more” menu
No search bar. Unlike an actual browser, Custom Tabs do not let you actually search for a specific URL (this isn’t really an issue if you’re just using the Google search bar)
Occasional bugs. Speaking for the Chrome version of Custom Tabs again, the tab is basically the browser. That means that any bugs that scuttle into Chrome will be present in your Tab, too.
Custom Tab Implementation
Basic Custom Tab Implementation
It turns out that a basic Custom Tab implementation is incredibly simple and straightforward. When I say “basic”, I mean that the user can click on a link and be taken to a Chrome Custom Tab where they can browse at their leisure.
Dependencies
Add the newest dependency to your gradle.build file
implementation 'androidx.browser:browser:1.2.0' This may cause a build issue but you can fix that by adding this too
implementation 'com.google.guava:listenablefuture:9999.0-empty-to-avoid-conflict-with-guava'
Implementation
If you’re using a fragment, all you need is this piece of code:
class SimpleTabsFragment : Fragment() {

    private lateinit var dashboardViewModel: DashboardViewModel
    var builder = CustomTabsIntent.Builder()

    override fun onCreateView(inflater: LayoutInflater,container: ViewGroup?, savedInstanceState: Bundle?): View? {
        dashboardViewModel = ViewModelProviders.of(this).get(DashboardViewModel::class.java)
        val root = inflater.inflate(R.layout.fragment_simple_tabs, container, false)
        return root
    }

    override fun onViewCreated(view: View, savedInstanceState: Bundle?) {
        super.onViewCreated(view, savedInstanceState)
        simple_tabs_button.setOnClickListener {
            var url = "www.google.com"
            var customTabsIntent :CustomTabsIntent  = builder.build();
            customTabsIntent.launchUrl(requireContext(), Uri.parse(url))
        }
    }
}
Relevant Steps
The CustomTabsIntent.Builder is declared as a class variable
The CutomTabsIntent is created by the builder
The intent is used to launch the specified URL
Congrats, your app is now using Custom Tabs!
Advanced Custom Tab Implementation
While Custom Tabs in and of themselves are cool, the above code doesn’t give your app much control or insight into what’s happening in the Tab browser. Most importantly, you won’t know when a new URL is loaded. To address this issue, we need to use the CustomTabsService.
Dependencies
The dependencies for this are the same as before.
implementation 'androidx.browser:browser:1.2.0'
implementation 'com.google.guava:listenablefuture:9999.0-empty-to-avoid-conflict-with-guava'
Implementation
This is a little more involved and has a few more moving pieces.
class AdvancedTabsFragment : Fragment() {

    lateinit var serviceConnection: CustomTabsServiceConnection
    lateinit var client: CustomTabsClient
    lateinit var session: CustomTabsSession
    var builder = CustomTabsIntent.Builder()

    override fun onCreate(savedInstanceState: Bundle?) {
        super.onCreate(savedInstanceState)

        serviceConnection = object : CustomTabsServiceConnection() {
            override fun onCustomTabsServiceConnected(name: ComponentName, mClient: CustomTabsClient) {
                Log.d("Service", "Connected")
                client = mClient
                client.warmup(0L)
                val callback = RabbitCallback()
                session = mClient.newSession(callback)!!
                builder.setSession(session)
            }

            override fun onServiceDisconnected(name: ComponentName?) {
                Log.d("Service", "Disconnected")
            }
        }
        CustomTabsClient.bindCustomTabsService(requireContext(), "com.android.chrome", serviceConnection)
    }

    override fun onCreateView(inflater: LayoutInflater, container: ViewGroup?, savedInstanceState: Bundle?): View? {
        val root = inflater.inflate(R.layout.fragment_home, container, false)
        return root
    }

    override fun onViewCreated(view: View, savedInstanceState: Bundle?) {
        super.onViewCreated(view, savedInstanceState)

        tab_button.setOnClickListener {
            val url = "https://www.google.com"
            //val url = "https://www.wikipedia.org"
            val customTabsIntent: CustomTabsIntent = builder.build()
            customTabsIntent.launchUrl(requireActivity(), Uri.parse(url))
        }
    }

    override fun onStart() {
        super.onStart()
        CustomTabsClient.bindCustomTabsService(requireContext(), "com.android.chrome", serviceConnection)
    }

    class RabbitCallback : CustomTabsCallback() {
        override fun onNavigationEvent(navigationEvent: Int, extras: Bundle?) {
            super.onNavigationEvent(navigationEvent, extras)
            Log.d("Nav", navigationEvent.toString())
            when (navigationEvent) {
                1 -> Log.d("Navigation", "Start") // NAVIGATION_STARTED
                2 -> Log.d("Navigation", "Finished") // NAVIGATION_FINISHED
                3 -> Log.d("Navigation", "Failed") // NAVIGATION_FAILED
                4 -> Log.d("Navigation", "Aborted") // NAVIGATION_ABORTED
                5 -> Log.d("Navigation", "Tab Shown") // TAB_SHOWN
                6 -> Log.d("Navigation", "Tab Hidden") // TAB_HIDDEN
                else -> Log.d("Navigation", "Else")
            }
        }
    }
}
Relevant Steps
The CustomTabsServiceConnection, CustomTabsClient, CustomTabsSession, and CustomTabsIntent.Builder are declared as variables
(onCreate) The serviceConnection object is created. Note the stable package name is com.android.chrome
(onCreate) The CustomTabsClient uses the serviceConnection to bind to the CustomTabsService
(onCreate) When the CustomTabsService is connected, we retrieve the client and warmup the browser
(onCreate) A custom CustomTabsCallback object is created
(onCreate) The new callback object is attached to a CustomTabsSession
(onCreate) The session is attached to the intent builder
(onClick) The CutomTabsIntent is created by the builder
(onClick) The intent is used to launch the specified URL
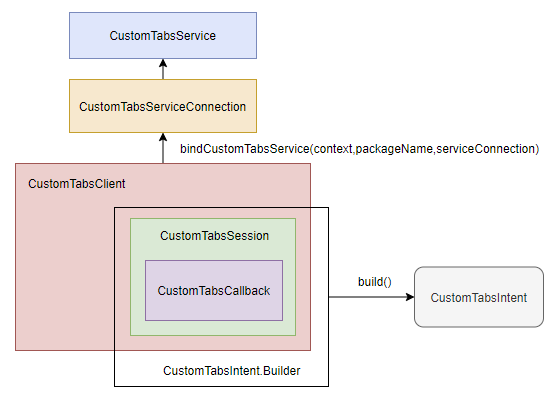
For visual learners like myself:

Custom Tabs component diagram
This build has several advantages over the simpler alternative. To start, you can use the onNavigationEvent() method in the CustomTabsCallback class to take actions based on the status of the Custom Tab (ex. If it has started or finished loading a new page).
You can also use the CustomTabsServiceClient to warmup() Chrome and the CustomTabsSession to guess at which links may be opened by the user with mayLaunchUrl().
client.warmup(0L)
session.mayLaunchUrl(Uri.parse("www.google.com"),null,null) val urlBundles = mutableListOf<Bundle>()
val otherUrls: Bundle = bundleOf(
CustomTabsService.KEY_URL to Uri.parse("www.wikipedia.org")
)
urlBundles.add(otherUrls) Custom Tab Customization
The Simple Stuff
As noted above, Custom Tabs benefit from a wide range of possible customizations (this example from Google covers a lot):
Change the toolbar colors
Toggle the toolbar title
Add the share option to the “more” menu
Change the close icon (There seems to be issues with updating the close icon as noted here. Notably, the size has to be 24dp x 24dp)
Hide the URL bar on scroll
Change the enter and exit animations (must be an R.anim resource — check out all these from the Android Open Source site!)
// Change tab toolbar color
builder.setToolbarColor(ContextCompat.getColor(main, R.color.black))
builder.setSecondaryToolbarColor(ContextCompat.getColor(main,R.color.colorAccent))
// Toggle title in header toolbar
builder.setShowTitle(true)
// Add share option to more menu
builder.addDefaultShareMenuItem()
// Change close icon
AppCompatResources.getDrawable(main, R.drawable.close_icon)?.let {
 DrawableCompat.setTint(it, Color.WHITE)
    builder.setCloseButtonIcon(it.toBitmap())
}
// Hide URL bar on scrolling
builder.enableUrlBarHiding()

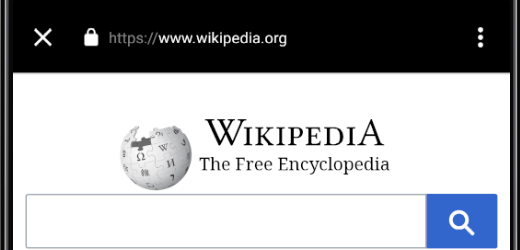
Title vs no title
The Not-So-Simple Stuff
In a Custom Tab, you have control over what action buttons appear in the toolbar. For example, Twitter allows you to tweet from theirs. In order to add this button you need to pass four arguments to the setActionButton() method of your CustomTabsIntentBuilder.
A bitmap that will be used as the button icon
A String description that explains what the button does
A PendingIntent that will be triggered when the button is pressed
A Boolean that determines if the icon is tinted
The PendingIntent below can send the current URL to any app.
// Create the pending intent
val sendLinkIntent: Intent = Intent(Intent.ACTION_SEND)
sendLinkIntent.setType("text/plain")
sendLinkIntent.putExtra(Intent.EXTRA_SUBJECT,"This is the link you were exploring")
val pendingSendLink = PendingIntent.getActivity(main,0,sendLinkIntent,0)
// Set the action button
AppCompatResources.getDrawable(main, R.drawable.close_icon)?.let {
 DrawableCompat.setTint(it, Color.WHITE)
    builder.setActionButton(it.toBitmap(),"Add this link to your dig",pendingSendLink,false)
}
If you only want your app to be able to respond to the intent (and therefore want the button to trigger an action in your app specifically), you will need to create an Explicit Intent. This simply means specifying your activity in the intent.
// Create the pending intent
val sendLinkIntent = Intent(main,MainActivity::class.java)
sendLinkIntent.setType("text/plain")
sendLinkIntent.action = Intent.ACTION_SEND
sendLinkIntent.putExtra(Intent.EXTRA_SUBJECT,"This is the link you were exploring")
val pendingSendLink = PendingIntent.getActivity(main,0,sendLinkIntent,PendingIntent.FLAG_UPDATE_CURRENT)
// Set the action button
AppCompatResources.getDrawable(main, R.drawable.close_icon)?.let {
 DrawableCompat.setTint(it, Color.WHITE)
    builder.setActionButton(it.toBitmap(),"Add this link to your dig",pendingSendLink,false)
}
In Conclusion
I hope you enjoyed this summary of Custom Tabs in Android! They definitely provide a more finished look to any app and will be more than enough for most use cases. I am currently looking into retrieving the current URL from the Custom Tabs (available now) and will write again if I figure that out. Until next time!
Extras
Resources
Issues
Apparently you can’t retrieve the URL from the Custom Tab
Activity has leaked ServiceConnection that was originally bound here


Comments