Flutter: Launcher Icons, Labels, and Splash Screens
- Joseph Muller III

- Jul 2, 2020
- 4 min read
Updated: Jan 14, 2021
Flutter Newbies Start Here
If you’re new to Flutter development, I’d recommend starting with something a little less involved.
I used this book to learn the Flutter language:
And this one to get started with mobile app development:
It’s all about the presentation
When designing a new app, there’s a lot of work that goes into designing and implementing the app logic. You need to design your database structure, the navigational scheme, and the user interface all while trying to stick to a coherent theme. When all is said and done, the development process for a small app can take between 3 and 9 months…and you might not always get it right the first time. When progress seems slow and you feel like you’re taking two steps backwards whenever you simply think about moving forward, there are a few boxes you can check off to boost your spirits.
Update your Launcher Icon
The launcher icon for your app is the first thing that people will notice when scrolling through the app store so it needs to be something other than the generic Flutter icon (obviously). Fortunately, Flutter has a flutter_launcher_icons package that makes this step a breeze.
Add the flutter_launcher_icons package to your dev_dependencies and then run pub get:
dev_dependencies:
  flutter_test:
    sdk: flutter
  flutter_launcher_icons: "^0.7.3"
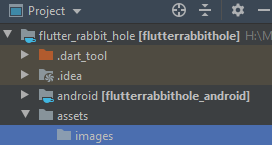
2. Create a new “assets” directory inside your project
3. Inside the “assets” directory, create another directory called “images”

4. Move your images (.png) to this new directory
5. In your pubspec.yaml file, add a flutter_icons entry that specifies the path of your image
flutter_icons:
  android: "launcher_icon"
  ios: true
  image_path: "assets/images/ic_launcher-playstore.png"
6. In the terminal, run the following:
flutter pub run flutter_launcher_icons:main And that’s it! Running this command will update all of the appropriate files for Android and iOS that are required to change the launcher icon. If you’d prefer to use different icons for the different platforms, the flutter_launcher_icons package has attributes that you can use to accomplish that.

Update your Launcher Label
By default, the display name of your Flutter app will be whatever is listed under the name attribute in the pubspec.yaml file. Many times, this is not pleasant to look at since the “‘name’ field must be a valid Dart identifier”. According to these naming standards for the pubspec file, this means the name must have:
All lowercase characters
Underscores instead of spaces
Only Latin letters and Arabic digits [a-z0-9_]
In addition, it cannot start with a number and it cannot be one of these reserved words. With that said, there are plenty of limitations in place if you want to update the name by only changing the the pubspec.yaml file. Instead, you’ll have to do it one of two other ways.
Manually
This post from Stack Overflow summarizes the steps that are necessary but I’ll summarize them below.
Android
The launcher label for Android devices can be updated in the AndroidManifest.xml file located at <project>/android/app/src/main/AndroidManifest.xml. Simply update the android:label attribute and you’re all set.
iOS
I’m less familiar with the iOS platform but the steps for updating the launcher label are equally as simple. Open the Info.plist file locate at <project>/ios/Runner/Info.plist, find the CFBundleName key, and then update the associated string.
<key>CFBundleName</key>
<string>flutterrabbithole</string>
Using a Flutter Package
Just like for updating the launcher icon, there is an existing Flutter package that can help relabel your app. It’s called (you guessed it) flutter_launcher_name and it’s incredibly easy to use.
Add the dependency to your pubspec.yaml file:
dev_dependencies:
  flutter_launcher_name: "^0.0.1"
2. In your pubspec.yaml file, add the following attribute with your app’s name:
flutter_launcher_name:
  name: "yourNewAppLauncherName"
4. In the terminal, run the following commands:
flutter pub get
flutter pub run flutter_launcher_name:main
Bang! You’re done.
Both methods are super easy and they both get you to the same spot so pick your poison.
Update your Splash Screen
In Flutter, your first step when solving an issue should always be to check for Flutter packages on pub.dev. It turns out that a simple search for the words “splash screen” returns a popular package for creating splash screens using Flare animations. If you’re interested in eventually making your splash screen more complicated than single image, this is how you’ll want to do it.
The specific package is called flare_splash_screen and the dependency looks like this:
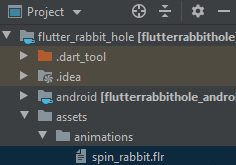
flare_splash_screen: ^3.0.1 After calling pub get, you’ll want to create an “animations” directory inside your “assets” directory. This will be used to store the Flare animations that we’ll eventually call in our application.

You can create a Flare animation on the Rive website which is close to effortless using their in-browser editing tool. I found this tutorial pretty helpful.
Once your animation is completed, export it and place it inside the assets/animations directory in your project. Then, list the animation in the pubspec.yaml file under assets like this using the full path name:
flutter:

assets:
    - assets/animations/spin_rabbit.flr
Import the package in your dart file:
import 'package:flare_splash_screen/flare_splash_screen.dart'; Then, in your first widget, make the “home” attribute your new splash screen.
class MyApp extends StatelessWidget {
  // This widget is the root of your application.
  @override
  Widget build(BuildContext context) {
    return MaterialApp(
      title: 'Rabbit Hole',
      theme: ThemeData.dark().copyWith(accentColor: Colors.green),
      home: SplashScreen.navigate(
        name: 'assets/animations/spin_rabbit.flr',
        next: (context) => SignInPage(),
        until: () => Future.delayed(Duration(seconds: 2)),
        loopAnimation: 'rotate_color',
      ),
    );
  }
}
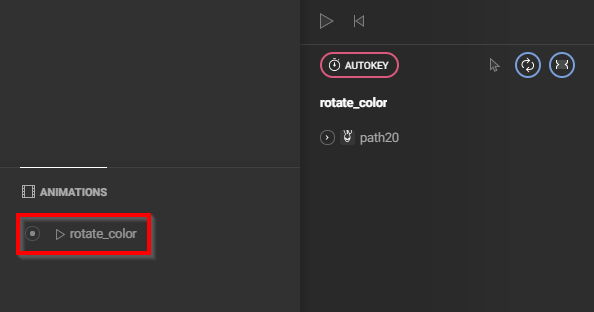
Note that the name of the animation must include the full path and the loopAnimation attribute needs to match the animation from the Animations box of the Flare editor.

In Conclusion
Once all of these things are done, you can sit back and feel like you’ve accomplished something for the day. Of course, there’s always more to do and optimizing even the simple things can take numerous hours, but you won’t get anything done if you don’t set out and get started!
Stay tuned for more articles on Flutter development!


Comments